How to Create XML Sitemap for Blogger
To Create XML sitemap for Blogger, we take following steps:
Step-1 To Generate an xml sitemap, open the Sitemap Generator and enter full url of your blogger blog and click on the Generate XML Sitemap button.
Step-2 This tool will instantly create an XML code as shown below. You are required to copy the code as highlighted in green area:
Step-3 To install an xml sitemap into your blogger site, take following steps:
How to Enable Custom Robots Header Tags in Blogger
To enable custom robots header tag in blogger we take following steps:
1. You’ve to log into the Blogger dashboard and select your blog/site.
2. Click on Setting.
3. In the right side, under “Crawlers and indexing” Section, Enable Custom Robots Header Tags option.
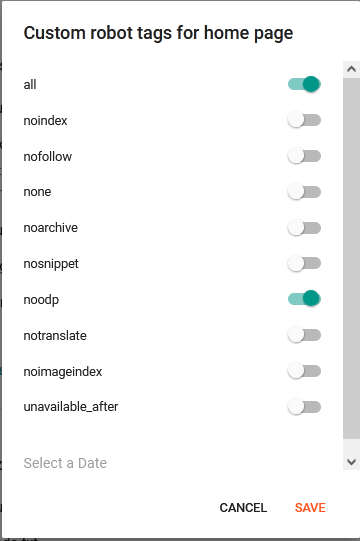
4. After enabling custom robots header tags, under this option click on Home page tags, following options will appear as shown below. You’ve to click on “all” and “noodp” options and save the settings.
How to Submit Sitemap to Google (search console)
Step-1 Select your property.
(Note: if your site ownership not verified in Google Search console, you must verify it, before this step)
Step-2 In left sidebar click “Sitemaps”.
Step-4 Click on Submit button.
How To Verify Ownership Of Your Website In Google Search Console
For more detail watch this video
More Articles:
- Best Webhosting Services for WordPress Websites
- Features of a Good Webhosting Service
- What is sitemap in Website | Importance and Types of Sitemaps
- How to Change Blogger Template | Theme
- How To Add Code Box In Blogger Post
- 10 Tips of Image Optimization for Website | Image SEO
- How to Embed a YouTube Video on Blogger Post
- How to Customize Blogger's ReadMore Button
- How to Install Windows 7 by a USB | Make Partitions - Step by Step


0 Comments