How to Install Windows 7 by a USB | Make Partitions - Step by Step

How to Install Windows 7 by a USB | Make Partitions - Step by Step

How to Install Windows 7 by a USB | Make Partitions - Step by Step

Better performance of your computer or laptop depends on clean installation of windows. In this article you will learn How To Install Windows 7 by USB with partition step by step. I also will described complete procedure of hard disk partitioning which is the most important part of the windows installation. I also described how to install windows 7 home premium, windows 7 professional & windows 7 ultimate and describe the difference of 32 bit and 64 bit operating systems and much more. 

Hardware Requirements for Windows 7 Installation

If you are looking to install windows 7 into your PC following are required before installation:

• 1 gigahertz (GHz) or faster processor.
• 1 gigabyte (GB) RAM (32-bit) or 2 GB RAM (64-bit)
• 16 GB available hard disk space (32-bit) or 20 GB (64-bit)
• CD/DVD or Bootable USB contains Windows 7 software

Windows 7 Installation by a USB

For a clean windows 7 installation you should take following steps:

1.  Boot Computer from CD/DVD or Bootable USB:

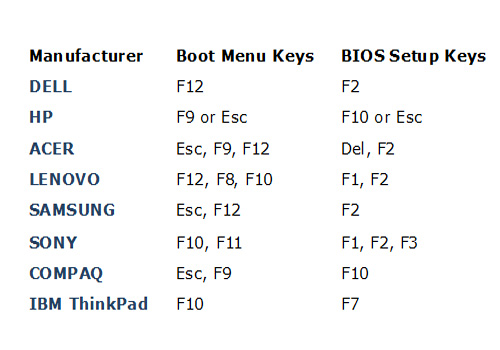
Insert CD/DVD or Bootable USB contains Windows 7 software into your Computer or Laptop. For windows 7 installation you need to boot your computer from CD/DVD or USB. Different computer have different keys to enter BIOS and Boot Setup. Some of them are listed below:

windows boot keys

1.  Enter Boot Into Options: 

When you start your computer a splash screen will appear for very short time. Normally in this screen shows Booting or BIOS setup. For instance, when you install window 7 on a Dell Computer a Splash Screen will appear as shown blow. You are required to press F12 key at the Dell splash Screen promptly.

 
Window 7 installation picture 1

3. Select Boot Optical Drive:

When you Press F12 Key at the starting of boot, following one time boot screen will appear. On the Boot Menu you will need to choose the Optical Drive that is CD/DVD/CD-RW Drive by Up and Down arrow keys and press the ENTER key. 

 
Window 7 installation picture 2

4.     A message “Press any key to boot from CD or DVD....._” will appear at the top of the screen.  Press any key from your keyboard to continue.

 
Window 7 installation picture 3

5.    Windows 7 Loads Installation Files  

The Windows 7 will begin to load files, this may take few seconds.

Window 7 installation picture 4


Window 7 installation picture 5

6.   Choose Language and Other Preferences

In this window you need to select your “language”, “time and currency format” and “Keyboard or input method”. You can change these if needed and click Next to continue.

Window 7 installation picture 6

7.    Click Install Now Button

Now the Install Windows 7 screen will appear. If you want to install new windows 7, click on Install now.  Here you may also repair your installed windows 7 by clicking on Repair you Computer option. We are installing new windows 7 therefore we click on Install now button to begin the installation of Windows 7.


Window 7 installation picture 7

8.    Select Operating System

Setup will begin and following screen will appear. Now in this screen you select your operating system, either 32bit or 64 bit. X86 represents 32bit operating system and x64 represents 64 bit operating system. In this window I am choosing Windows 7 Professional X64 bit and click on Next Button.


Window 7 installation picture 8

9.    Accept the Windows 7 License Terms

Now the License agreement page appears. Read the license terms and click on I accept the License terms then click Next to continue. 

 
Window 7 installation picture 9

10.    Select Type of Windows 7 Installation

Next window you will ask Type of installation.  If you want to upgrade your old windows click on Upgrade.  We are installing new window therefore we click on Custom (Advanced) option.
 
Window 7 installation picture 10

11.       Create, Format and Delete Partition

This is a very important step of widows 7 installation. You may click Next for Automatic Hard Drive setup using full capacity. Otherwise click on the Drive Options (Advanced) to configure the drive yourself. I recommend you before Windows 7 installation you must partition your hard drive alteast into two parts. Windows 7 install in one partition and save your data in another partition, so that in the case of virus or any other error your data will be secure.

Window 7 installation picture 11

12. How to Make Partition of a Hard Drive

To make a partition you need following steps:

a.    Click on the Drive Options (Advanced)
 
Window 7 installation picture 12
b.    On the Drive Options Menu click on New
 
Window 7 installation picture 13

c.    Select Partition Size: Type your require partition size into the size box, and click Apply to continue.(NOTE:  Windows 7 needs a minimum of 16GB free space on hard drive.)
 
Window 7 installation picture 14

d.    A message will appear and Windows says that it may need to create a new partitions for the system. Click OK to continue. 
 
Window 7 installation picture 15
e.    Setting the drive up may take a few seconds and following window will appear. This window shows two partitions. First one Disk 0 Partition 1 created by windows automatically. This partition reserved windows system files. Under partition 1 system reserved another partition Disk 0 Partition 2 appear. This is the one you created in previous step. Disk 0 Partition 2 is also our C Drive and we will install Windows 7 in this partition. Disk 0 Unallocated Space indicates unused space.
Window 7 installation picture 16

f.    Create another Partition: Now we create another partition with unallocated space. To create another partition move cursor on Disk 0 unallocated space than click on New, and create partition as mentioned in previous steps. After creating of new partition following screen will appear. In this screen a new partition Disk 0 Partition 3 appears. This is our second partition or D Drive.
Window 7 installation picture 17
g.    Format a Partition:  Now you should to Format Partition 2 for better performance of your windows 7. For this purpose select the Disk 0 Partition 2 and then click on Format
Window 7 installation picture 18
h.       Delete a Partition: If you want to delete a partition, bring you cursor on this partition and click on Delete, your partition will be deleted and shown unallocated space.

13.    Choose Drive and Installed Windows:  

Now select the drive Disk 0 Partition 2. This will be the same drive that you formatted in the previous step. Once its selected click on Next to begin the installation of Windows 7.
Window 7 installation picture 19
14.      Windows will now begin copying files Windows 7. Setup will now install a clean copy of Windows 7. You don't need to do anything here but wait. This is the most time consuming step. This process could take approximately 20 to 30 minutes depending on the speed of your computer. During installation process your computer restart several times:
 
Window 7 installation picture 20

15.      Once done it will begin copied windows files and then expand windows files. Expand windows consume several minutes to complete. 
 
Window 7 installation picture 21

16.      When the files are Expanded it will now install features.

Window 7 installation picture 22

17.      During installation process your computer will restart, and following screen will appear. 
 
Window 7 installation picture 23

18.      The computer will restart and continue installation again. During restarting you remember that you don't need to do anything even when a screen having the message “press any key to boot from CD/DVD…” appear.  
 
Window 7 installation picture 24
 Window 7 installation picture 25


Window 7 installation picture 26
 
19.      After restart computer resume installation process and following screen appear. 
Window 7 installation picture 27

20.      Computer will restart again and following screens will appear.
Window 7 installation picture 28

Windows is starting again.

Window 7 installation picture 29

Setup is preparing your computer for First use.
 
Window 7 installation picture 30

Setup is checking video performance 
 
Window 7 installation picture 31

21.      Choose a User Name and a Computer Name: Type User Name and computer name and click Next.
 
Window 7 installation picture 32

22.      Choose a Password to Access Windows 7: Microsoft recommends that you choose a password that will be required when starting Windows 7 before access to your user account will be allowed. You may leave it without password and just click on Next to continue.
 
Window 7 installation picture 33

23.      Enter the Windows 7 Product Key: Enter the product key of Windows 7 and Enter Next. (Note: If you don’t have any product key you may skip this step.)
 
Window 7 installation picture 34
 
24.      Choose a Windows Update Option:  In this screen Windows 7 is asking you to choose how you want to automatically install updates from Microsoft's Windows Update service. There three options available.

  • Use recommended settings
  • Installed important updates only
  • Ask me later

I recommend you to choose Install important updates only. This option is the safest because it restricts Windows 7 from doing anything with your data automatically. You may also choose use recommended settings option but I do not recommend you to choose Ask me later option.
Window 7 installation picture 35

25.      Choose the Time and Date Setting:  In this window you may review your time and date setting and choose the correct Time zone.
 
Window 7 installation picture 36

26.      Choose your network setting: In this window you may select your network location i.e. Home networkWork network or public network.

If you want to setup the homegroup choose Home network. Most of us choose Home Network option.

If you want a standard network setup then use Work Network, allowing you to browse and see other computers.

If you are connected with a public network that would be a risk to your files and security, select Public Network.
Window 7 installation picture 37

27.      Windows 7 finalization setting:  Window finalization your settings and appear following message

Window 7 installation picture 38

Welcome on windows
 
Window 7 installation picture 39

28.      Congratulations, your windows 7 completely installed and following screen will appear.
 
Window 7 installation picture 40


YouTube video

Post a Comment

Previous Post Next Post